CalendarStore Reference
SchedJoules iOS CalendarStore.framework
With this framework you can easily integrate the SchedJoules Calendar Store in your iOS app, with only a couple lines of code.
Overview
The CalendarStore.framework contains both a high level UI API as well as a low level object API. The high level API allows one to quickly integrate the Calendar Store into your app, while the low level API gives complete control over the data.
Requirements
iOS version
The CalendarStore will at least need iOS7 to function.
Xcode
Xcode 7 is required for the CalendarStore framework to work.
Architectures
The CalendarStore framework supports the armv7, armv7s, arm64 and i386 (simulator), x86_64 (simulator) architectures. Armv6 is not supported.
Getting Started
To get the CalendarStore.framework up and running, you need to add the Framework and the Bundle to your project and then set your AuthorizationToken.
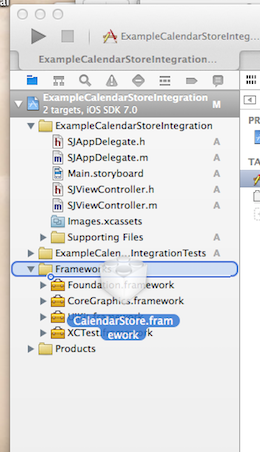
Framework
First, drag CalendarStore.framework into your project, under the “Frameworks” folder.
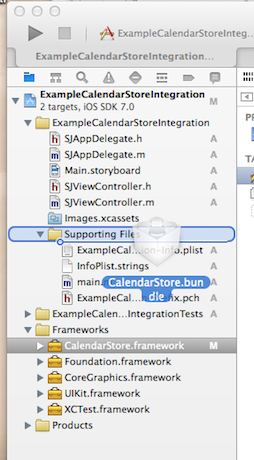
Bundle
Next, drag CalendarStore.bundle into your project. This bundle contains the resources used by the Calendar Store.
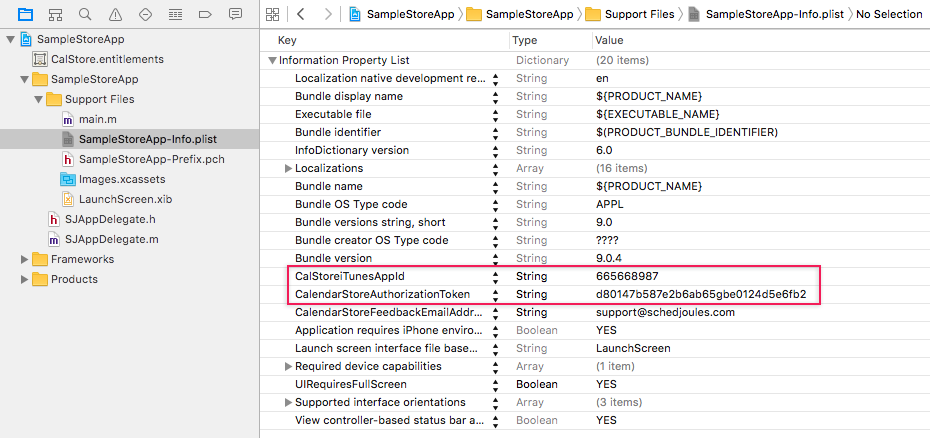
AuthorizationToken and AppId
Add your own AuthorizationToken and your own Apple ID to the project’s Info.plist file under the CalendarStoreAuthorizationToken key and the CalStoreiTunesAppId key. If you don’t have an AuthorizationToken, you can request one via support@schedjoules.com .
It’s also possible to set your AuthorizationToken in code:
- (BOOL)application:(UIApplication *)application didFinishLaunchingWithOptions:(NSDictionary *)launchOptions
{
    [CalStoreController sharedController].authorizationToken = <# Your AuthorizationToken Here #>;
}
Set Feedback E-mail
Optionally, set the e-mailaddress that your users can send feedback to. If you don’t set it, it will default to support@schedjoules.com. Add your own support e-mailaddress to the project’s Info.plist file under the CalendarStoreFeedbackEmailAddress key.
It’s also possible to set your own support e-mailaddress in code:
- (BOOL)application:(UIApplication *)application didFinishLaunchingWithOptions:(NSDictionary *)launchOptions
{
    [CalStoreController sharedController].authorizationToken = <# Your AuthorizationToken Here #>;
    [CalStoreController sharedController].feedbackEmailAddress = <# Your Support Email Here #>;
}
Done!
The CalendarStore.framework now successfully has been integrated into your project.
In-App Purchases
The CalendarStore uses In-App Purchases to provide access to the calendar feeds for users. Since API v2.0 auto-renewable subscriptions are used rather than indivual Non-Consumable In-App Purchases. Prior to enabling In-App Purchases in your App, you need to configure your App in iTunes Connect. Follow the instructions in the Subscription Setup Guide.
Enabling In-App Purchases for your App
Since The CalendarStore uses auto-renewable subscriptions as In-App purchases, you’ll need to enable In-App Purchases for your app. You can read more on how to do so in Apple’s Documentation on this subject: https://developer.apple.com/library/ios/technotes/tn2259/_index.html.
Showing The CalendarStore, the easy way
All it takes to show the CalendarStore is 3 lines of code. First, include the CalendarStore.h header:
#import <CalendarStore/CalendarStore.h>
Next, to launch the Store, present an instance of the CalStoreCalendarStoreViewController. The best place to do this is when a user taps on special “Launch Calendar Store” button.
CalStoreCalendarStoreViewController* vc = [CalStoreCalendarStoreViewController calendarStoreViewController];
[self presentViewController:vc animated:YES completion:nil];
Show Intro Walkthrough
Optionally, you can show a walkthrough for the Calendar Store.
- (BOOL)application:(UIApplication *)application didFinishLaunchingWithOptions:(NSDictionary *)launchOptions
{
    [CalStoreController sharedController].authorizationToken = <# Your AuthorizationToken Here #>;
    [CalStoreController sharedController].feedbackEmailAddress = <# Your Support Email Here #>;
    [CalStoreController sharedController] presentModalIntroFromViewController:self.window.rootViewController];
}
Subscription Intro
Optionally, you can adjust the subscription purchase UI.
By default, the CalendarStore will present an intro screen prior to the subscription purchase. You can turn it off by setting:
[CalStoreController sharedController].useDefaultSubscriptionIntro = NO;
You can set a custom ViewController for the subscription intro, by passing the ViewControllers name. The ViewController must conform the CalStoreSubscriptionIntro protocol. If a invalid ViewController is passed, the CalendarStore won’t show an intro.
[CalStoreController sharedController].subscriptionIntroViewController = @"CalStoreSubscriptionDefaultIntroViewController";
Intro theming
The intro walkthrough and subscription intro can by themed by setting a custom CalStoreColorConfiguration
    CalStoreColorConfiguration* colorConfiguration = [CalStoreColorConfiguration defaultConfiguration];
    colorConfiguration.inverseTextColor = [UIColor whiteColor];
    [CalStoreController sharedController].introColorConfiguration = colorConfiguration;
Going the Extra Mile: the Low-Level API
If you want more control over how the Calendar Store is displayed, you can use the low-level API of the Calendar Store. This API is also used by the CalStoreCalendarStoreViewController class. The low-level API exists of objects modelling the CalendarStore data. Check out the documentation on the CalStorePage and CalStorePageRequest classes to get started.
Programming Guides
Class References
- CalStoreAvailableTranslation
- CalStoreBaseApiContentViewController
- CalStoreBaseViewController
- CalStoreCalendarBundle
- CalStoreCalendarBundleRequest
- CalStoreCalendarParameterOption
- CalStoreCalendarParameterOptions
- CalStoreCalendarStoreViewController
- CalStoreController
- CalStoreCountry
- CalStoreError
- CalStoreEventKitController
- CalStoreIcon
- CalStoreInstallCalendarViewController
- CalStoreLanguage
- CalStoreObject
- CalStorePage
- CalStorePageItem
- CalStorePageItemCalendar
- CalStorePageItemPage
- CalStorePageItemParameterizedCalendar
- CalStorePageItemPurchasable
- CalStorePageRequest
- CalStorePageSection
- CalStorePickCountryViewController
- CalStorePickLanguageViewController
- CalStorePriceInfo
- CalStoreSearchRequest
- CalStoreStoreKitController
- CalStoreStyledPageViewController
- CalStoreSubscription
- CalStoreSupportedCountriesRequest
- CalStoreSupportedLanguagesRequest
- CalStoreWeatherCalendarViewController
- CalStoreWeatherCitiesWithinRegionRequest
- CalStoreWeatherCity